What can you do with your CRM?
A series of practical use cases for CiviCRM.
Our non-profit clients all use CiviCRM to build relationships and maintain engagement with their constituents whether they are donors, members, event attendees, volunteers, funders or grant recipients. When used together with a web content management system like WordPress, CiviCRM becomes a powerful tool for streamlining operations by allowing constituents to interact directly with your organization via your website and serving as a centralized repository for your constituents’ contact information and engagement history.

In this series we’re exploring practical ways to leverage CiviCRM’s features. This post explains how we built a simple check-out / check-in system and an accompanying report.
Note: this application is intended to be used by staff who have backend access to CiviCRM.
Use case: log and report on custom activities
CiviCRM can be used to log and track different types of activities so that we can report on various points of engagement between an organization and its constituency. Recording an activity history for constituents is at the core of what a CRM does.
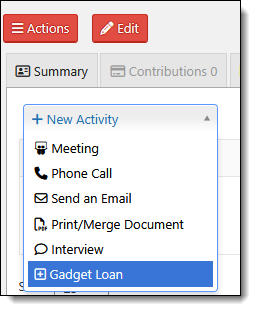
CiviCRM already has built-in activity types so we can track Phone Calls, Meetings, Emails, and more. In this post, we walk through how we used CiviCRM’s SearchKit and FormBuilder to build a simple CRM application to track a custom activity, gadget loans.

Our application is designed for staff members to log gadgets borrowed by a constituent. It consists of an input form and two different displays of the data. The first display, the Gadget Loans Report, is a searchable, sortable table showing all instances of any gadgets loaned to a constituent. The second, Gadget Loans (Tab), is a list of all loan activity by an individual, show as a separate tab of their Contact record.
We need an input form to collect the borrower’s name and email address, note the number of gadgets being borrowed, and optionally assign a due date. We include a text area field where additional details can be noted.
We’ll get into a behind the scenes look at building the form in the next section, but for now all you need to know is that when the form is submitted a loan is recorded in CiviCRM as a custom Activity Type and associated with a Contact. The form checks for an existing Contact by comparing the combination of the name and email address to records in CiviCRM. If no matching Contact is found a new one is created. If a Contact already exists, the form just records an Activity for the Contact.
The Gadget Loans Report (built with Search Kit) shows all loans made to constituents, along with the same fields shown on our input form plus a few additional fields: the date the loan was made, the status of the loan, the number of gadgets returned, and the return date.

As of CiviCRM 6.9, SearchKit allows us to designate certain columns as “in-line editable,” which means the staffer does not have to drill into an individual Contact record to log an item when it is returned, update the status or due date, or add more notes. Clicking on any editable field in the display table opens the editor for any editable field (or for all the editable fields within the row, if that option is selected when setting up the report). Clicking on the little green checkbox saves the data and updates the Activity record.

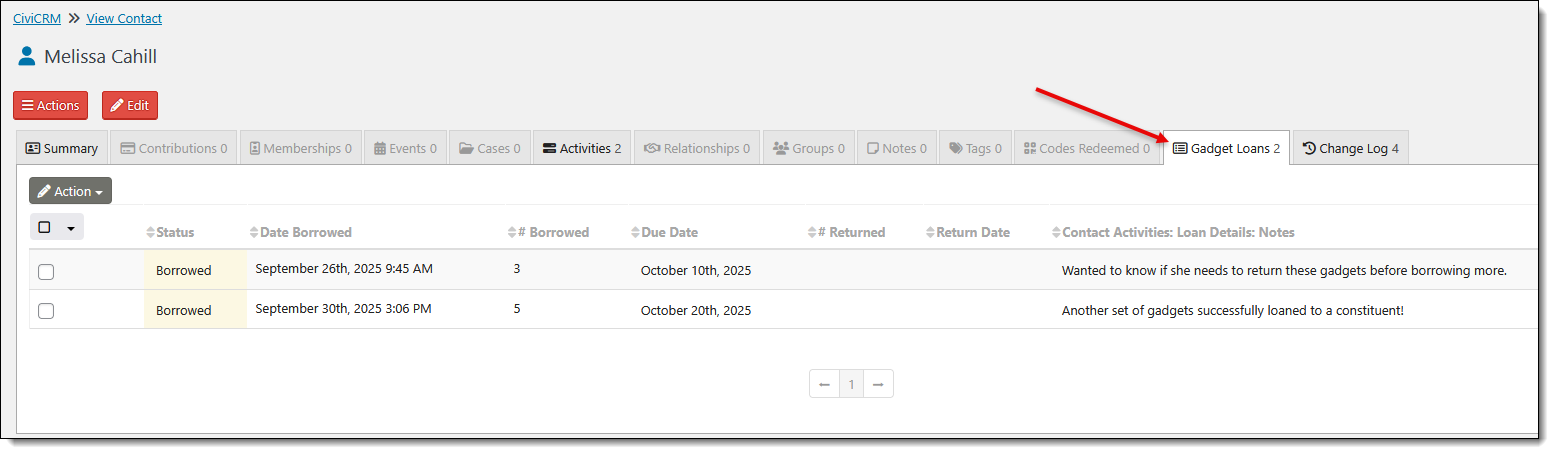
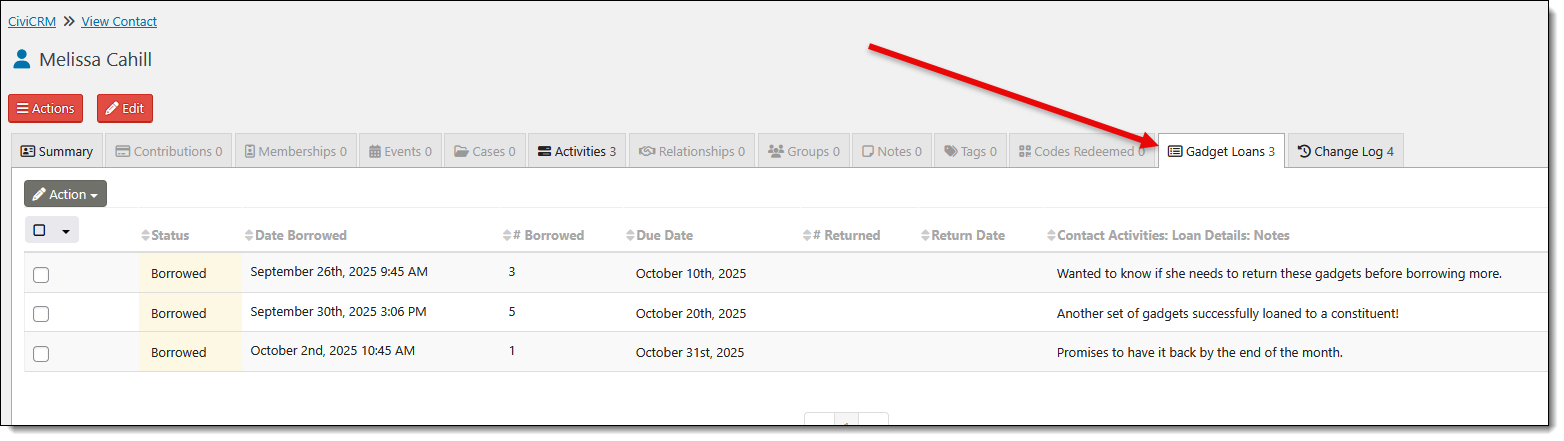
Gadget Loans also appear on an individual’s contact record. For our example we created a tab to display the Activity data, but it can just as easily be shown as a section of the Contact Summary screen.
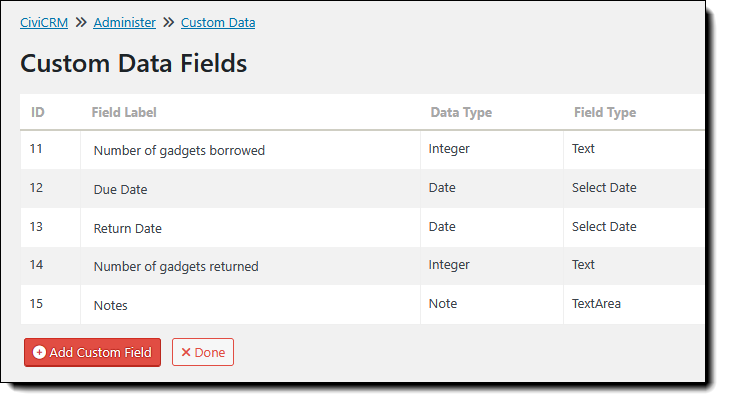
Before we can start building any input forms or reports to track Activities, we need to define our custom Activity Type and determine what, if any, Custom Data fields we want to record for the Activity.
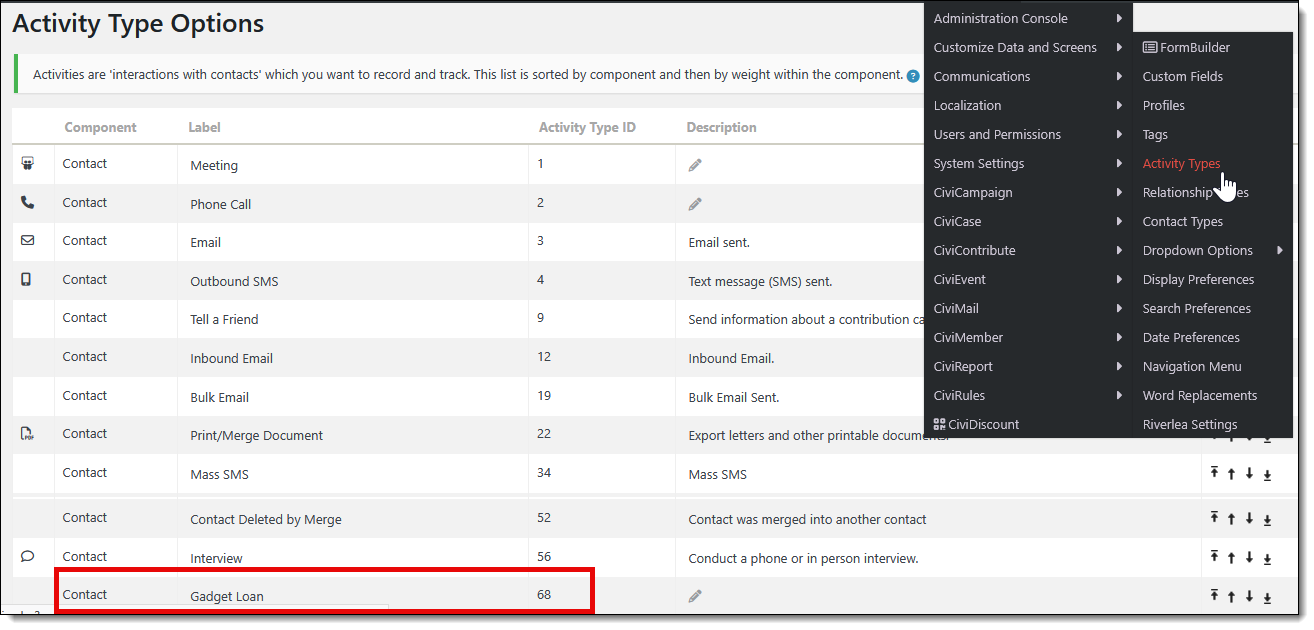
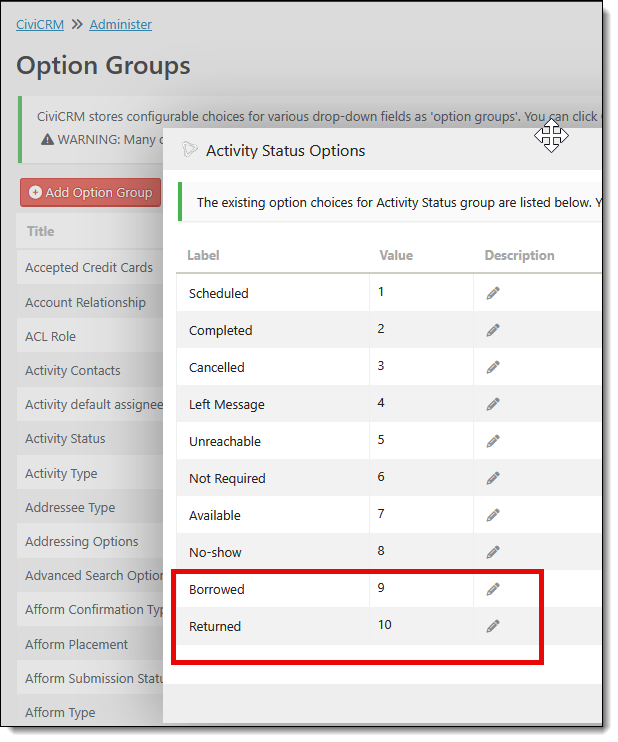
Our custom Activity Type is called “Gadget Loan” and we also want two custom Activity Status options to reflect either a “Borrowed” or “Returned” state. This is done by navigating via the CiviCRM menu to Administer->System Settings->Option Groups and then editing the options available for Activity Status.
Custom Data Fields
With the new Activity Type and Activity Status fields are in place, we define some Custom Data to reflect the fields we want to collect through our form. Using the CiviCRM menu, navigate to Administer > Custom Data and Screens > Custom Fields.
First, we indicate that we want our Custom Fields to be tied to an Activity as opposed to a Contact or an Event, etc. If we don’t specify an Activity Type, the Custom Data fields will be used for all Activity Types. In our case, we specify that we want these fields to be available only for the Gadget Loans Activity. We then define each field to be used in our form and reports.
Using FormBuilder for a Submission Form
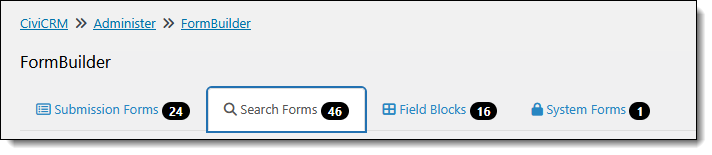
With all the building blocks in place, we can now use FormBuilder to put together the input form. You can find the FormBuilder menu item under Administer->Custom Data and Screens. FormBuilder allows us to create both Search Forms for filtering search results, and Submissions Forms for entering data. For our Gadget Loans input we need both, but we’ll start by creating a Submission Form.
The FormBuilder editing screen is divided into two columns. In the left column are the configuration settings and in the right is the Form Layout canvas, where we can drag and drop and arrange our input fields.
FormBuilder Tab: Individual 1
When we first create a new Submission form the left half of the screen shows two tabs by default: the Form Settings and a tab for Individual 1. FormBuilder assumes that this form will be connected to a Contact in the CiviCRM database and Individual 1 represents that Contact.
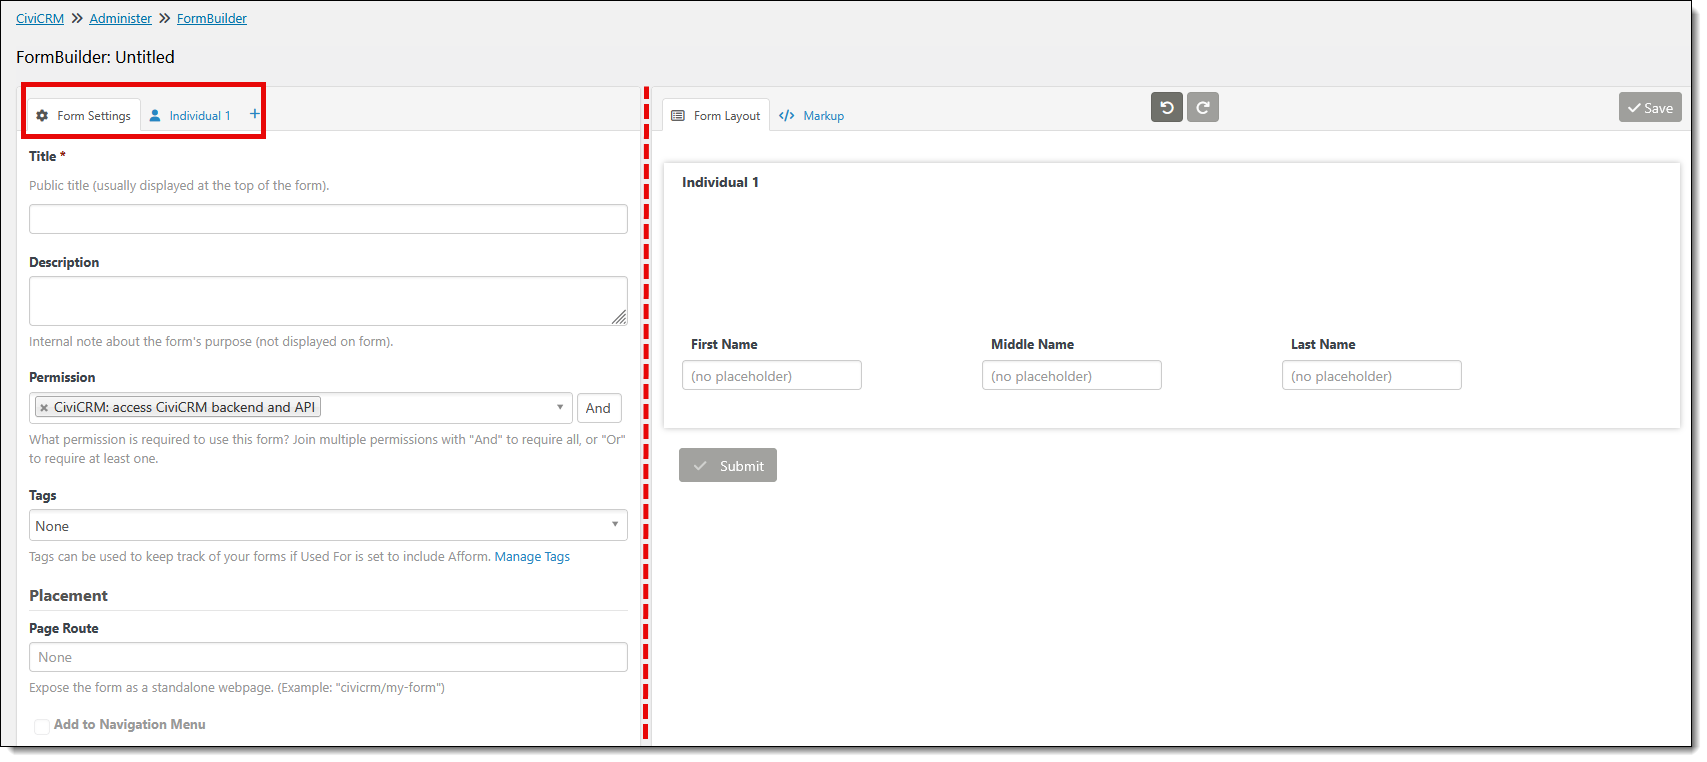
By default, CiviCRM sets up the Form Layout window of Individual 1 with input fields to accept First, Middle, and Last Name. We can add/remove Contact fields as needed by finding what we want in the lists that appear on the left side of the screen and dragging them onto the canvas.
We don’t use any custom Contact Fields in our Gadget Loan example, but any Custom Fields that have been previously defined in CiviCRM will be available in the FormBuilder (see screenshot with red dotted line showing the Custom Data Fields defined for Contacts in our CiviCRM database) as well as all the standard Contact and Email Fields.
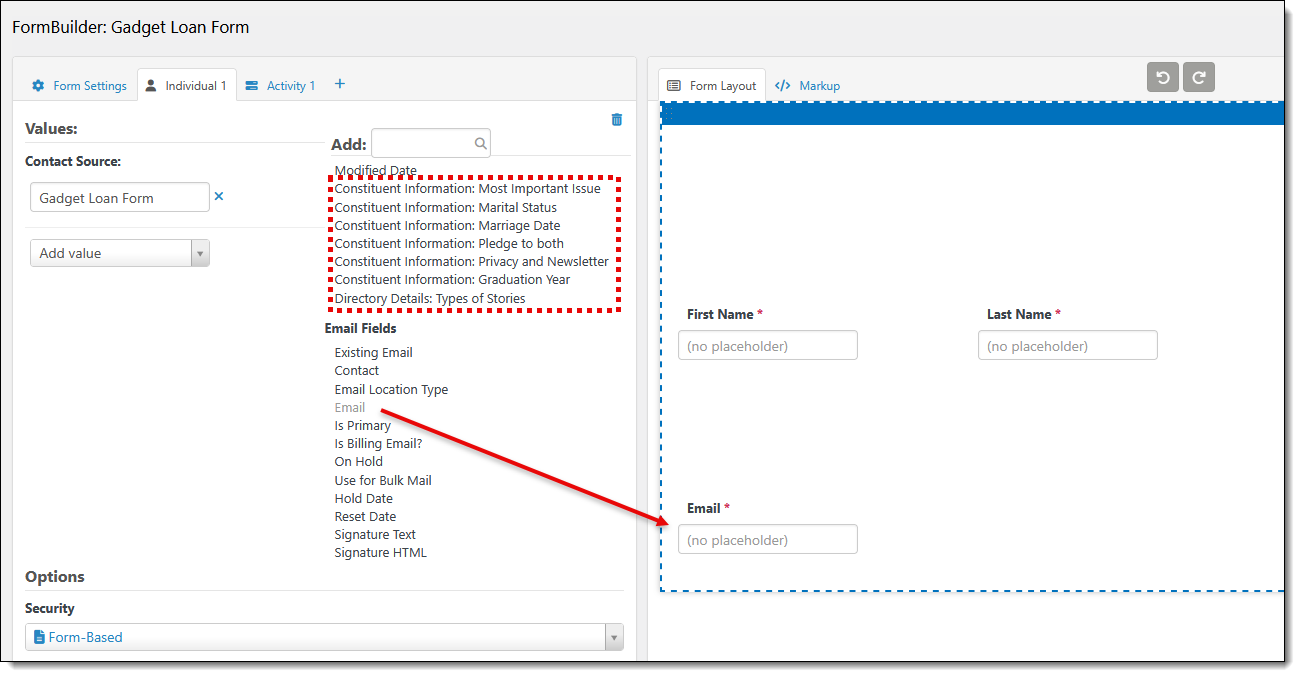
In the Individual 1 tab we also provided a value for the Contact Source – in this case we added Gadget Loan Form. More on adding values manually, rather than relying on user input, below.
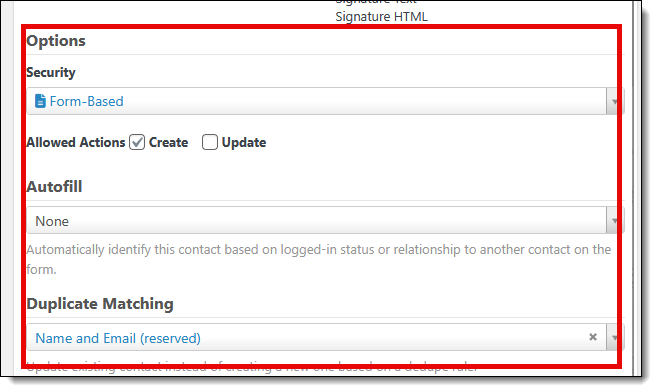
On the bottom-left side of the screen are Options for how we want the form to behave. We used Form-Based security here and are only allowing the form to be used to create records. No autofill is needed, but we do want to do some basic dupe checking based on Name and email.
FormBuilder Tab: Activity 1
By clicking on the little + sign next to the tabs on the left, we can create a new one, Activity 1, to capture Activity data for the Contact. As with the Individual 1 tab, we can drag and drop the fields we want to include on our form from the lists on the left to the Form Layout canvas. The Activity Fields list will show all the standard Activity Fields as well as the ones we defined in our Custom Data.
Some fields we want to set ourselves rather than asking for user input. Obviously, we want to indicate this Activity Type is a Gadget Loan. Plus, the Borrowed Date should always be set to the date and time that the form is completed, the status should automatically be set to “Borrowed,” etc. Instead of dragging those input fields onto the canvas we set them using the “Add Value” dropdown box, selecting the field we want, and providing a value. Using this method we can set/standardize as many fields as needed without relying on user input.

The bottom-left portion of the Activity tab also has an Options setting for the form behavior. These will generally be set the same as the Individual 1 tab.
FormBuilder: Form Settings for Submission Form
When we have our form looking the way we want we can go back to the first tab, the overall Form Settings. While we won’t dive into all the settings in detail, below we outline the settings we used for this use case that were not set by default. We left all the default settings except as indicated below.
Title and Description are self-evident. It’s important to note, though, that CiviCRM will use whatever you enter in the Title field as the permanent database entry name, so the first time you are saving the form be sure to give it a descriptive but succinct Title. You can always edit it later, but the first save writes and locks the name in the database. Make it short so it will be easy to query or otherwise access later, if needed.
By default, FormBuilder permissions are set to allow anyone with backend access to CiviCRM to access the form. It works here because the form is intended for use by staff with access to CiviCRM. Other levels of access are possible, and access can be assigned very granularly. For applications where an input form needs to be accessed by the public, a front-end page can be used to expose it.

We set a Page Route so that we can generate a better-looking URL for our form than the default.
We opt to show a simple confirmation message rather than the other option, redirecting users to a separate confirmation page. For our use case the simple confirmation message works.
Building Views/Reports with SearchKit
Now that we’ve built the form, we can use SearchKit to build the reports. You can find SearchKit in the CiviCRM menu under “Search.”
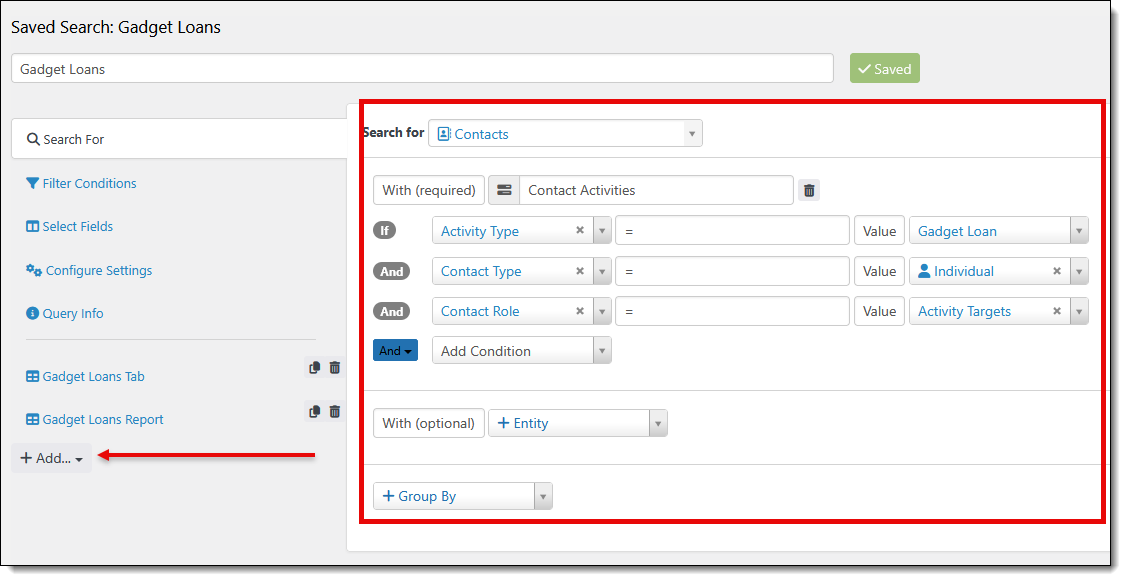
SearchKit is used to build the searches that populate our two views/reports: (1) the Gadget Loans Report, a searchable, sortable listing of all loans and (2) the Gadget Loans individual report that shows in the Gadget Loans tab of the Contact record.
The query is very simple and has no Filter Conditions. We are selecting Contacts that have a Gadget Loan Activity and returning every instance, i.e., not grouping the results. If we were to “Group By” Contact, we’d get only one row back for each Contact with the sum of all the gadgets they’d ever borrowed and that’s not what we want. We want a list of each time they’ve borrowed gadgets.
SearchKit Display Tables
Once we have the search returning the proper data, we create Displays to publish it. On the left side of the screen is a little +Add button that drops down a list of options: Table, List, Grid, Chart, and more. We’ve chosen Table for both our “Gadget Loans Tab” and “Gadget Loans Report.”
A Table Display allows us to design the layout of our report and decide which features we want to include. The Table Display screen is divided into two sections, top and bottom. The top section, Display Settings, shows all the form-level settings: the name of the form, permissions, sorting, styling, header/footer, and whether and how to allow in-place editing.
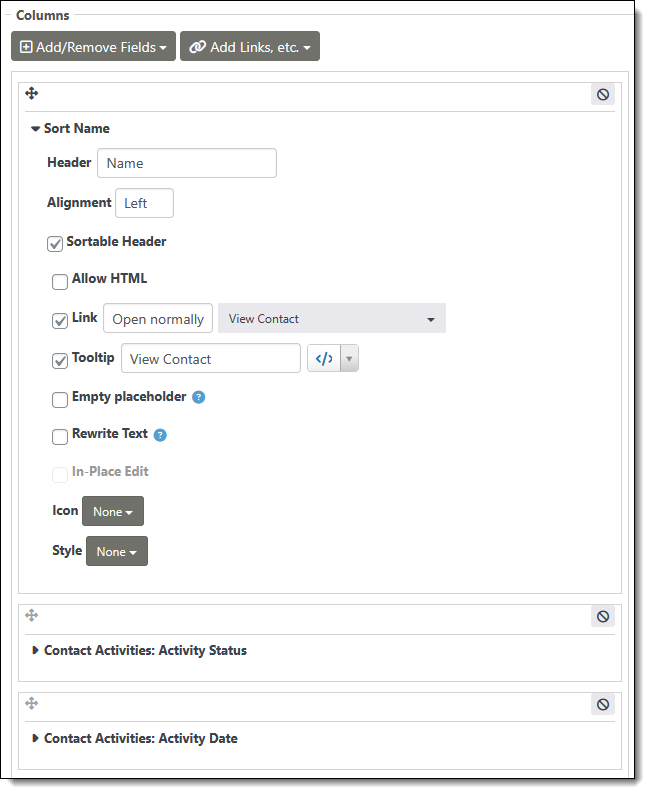
The bottom section, Columns, includes all the options for how each column appears and behaves.
This screenshot shows the “Sort Name” column of the Gadget Loans Report expanded to show all the options. We’ve renamed the column and indicated we want this field linked to open the corresponding Contact Record.
We renamed most of the columns in the table to shorten the headings and we made a few fields editable directly within the table by checking the In-Place Edit checkbox. Note that the In-Place Edit option first needs to be made available in the Display Settings before this functionality can be applied at the field level.
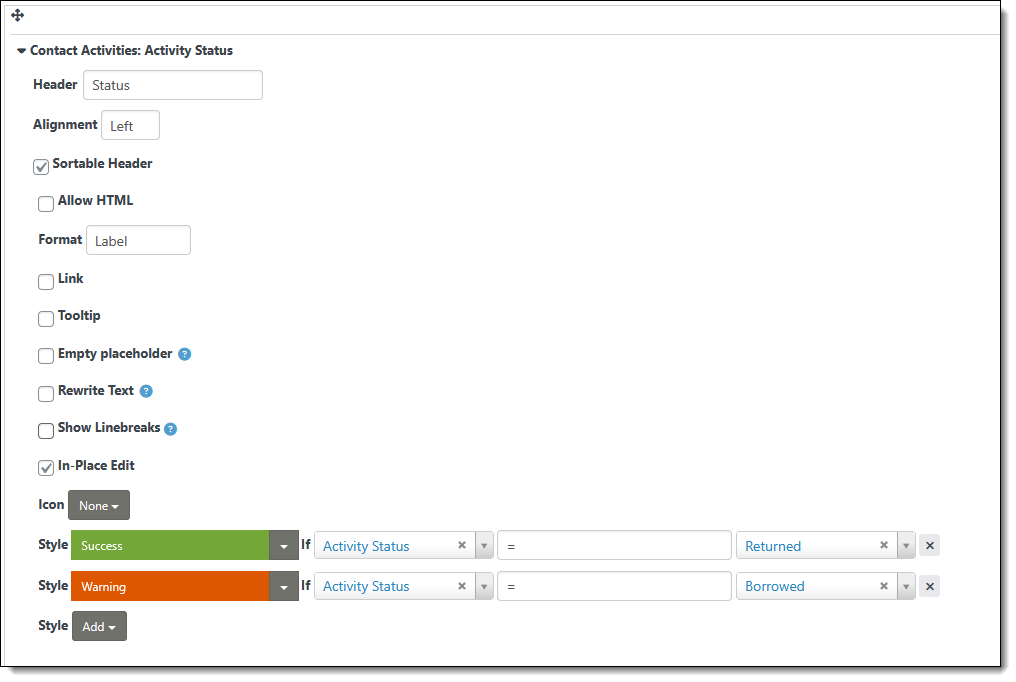
We also wanted to highlight the Activity Status to show as yellow when items were borrowed and green when they were returned. This is done by applying conditional styling to the Activity Status field based upon its value.
While the Gadget Loan Report is a list of all Contacts who have borrowed gadgets, the Gadget Loans Tab will be shown in a tab on an individual’s Contact Record so we don’t need any Name column in our table. Otherwise, the columns and settings for the Gadget Loans Tab Display is identical to the Gadget Loans Report Display.
Creating Search Forms in FormBuilder
We use FormBuilder not only to create input (submission) forms, but also to provide a search/filter feature for SearchKit Displays and/or to expose the Display in different areas of the CiviCRM UI. The main FormBuilder screen displays Search Forms and Submission Forms in separate tabs.
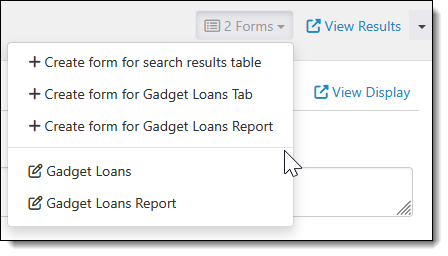
Search Forms are always created from — and associated with — a SearchKit Display. The Forms button in the upper right-hand corner of the SearchKit editing screen provides a way to create a form from a Display Table.
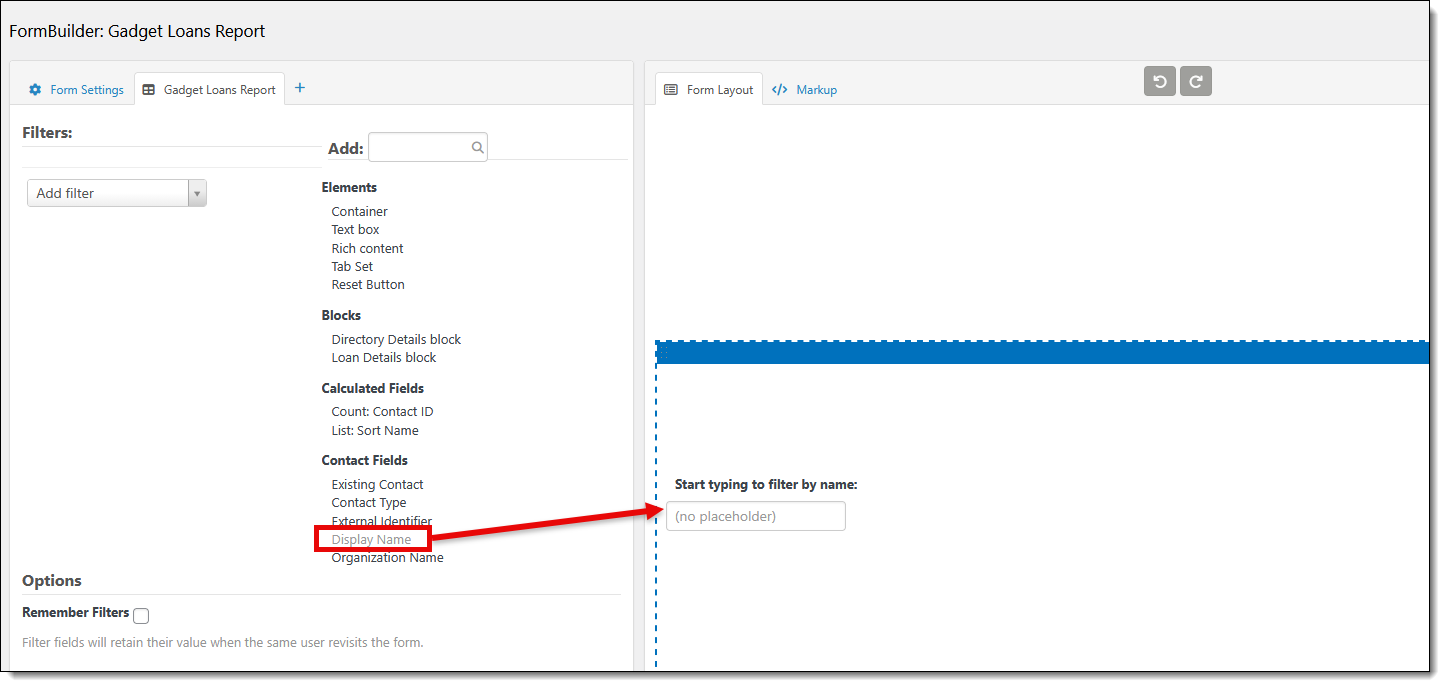
After selecting a Display Table to use for the form, the FormBuilder editor will appear and the selected Display Table will appear in the Form Layout window on the right. The Gadget Loans Report is a very simple dataset so we only need to be able to filter the list by Name. From the Gadget Loans Report tab on the left, we drag and drop the Display Name Field above the Display Table, rename the label, and save the form.
To search/filter more robust datasets we can include additional fields. Multiple search fields can help drill down into the specific results we want to see.
FormBuilder: Form Settings for Search Forms
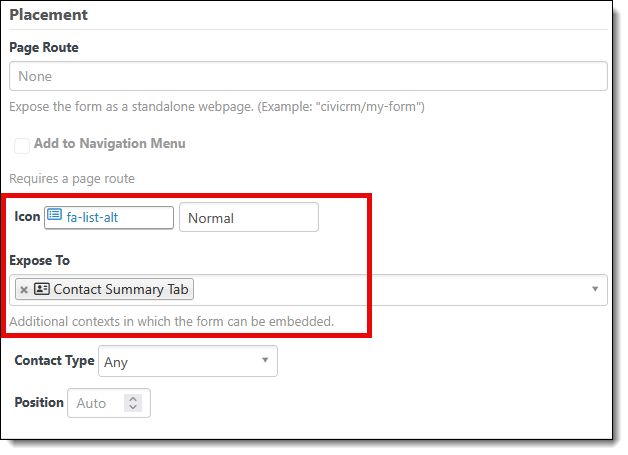
In addition to the Title, Description, Permissions and Page Route settings that we already looked at for our Gadget Loan Submission Form, we want to set the “Expose To” field for both our Search Forms.
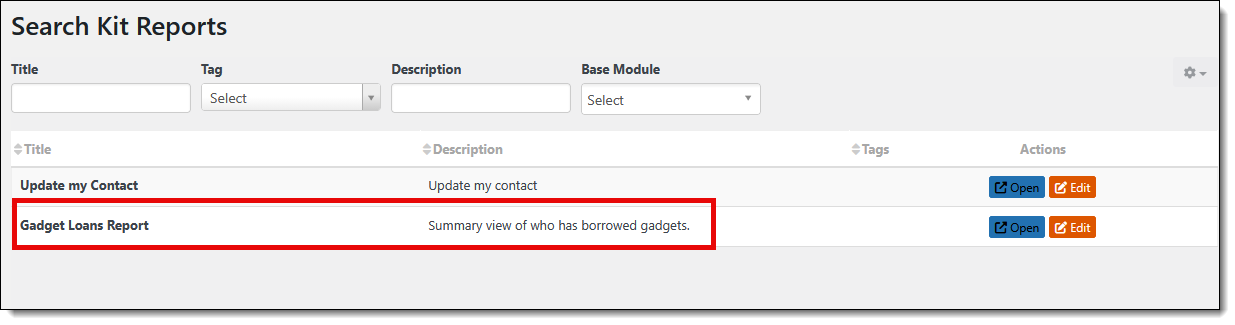
We want the Gadget Loans Report shown in CiviCRM’s Report Listing. Note that SearchKit Reports are kept separate from the traditional CiviCRM Reports and accessible from the main Reports menu item.
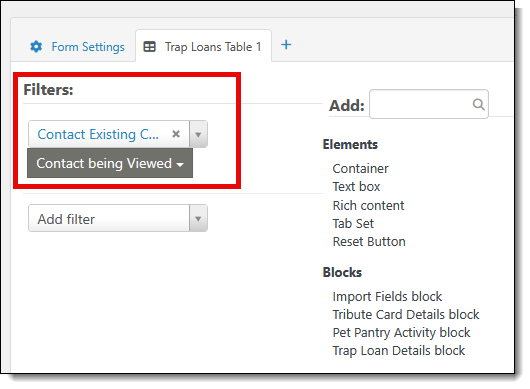
The Gadget Loans Display Table that shows the data without the Contact’s name and the filter feature is exposed to the Contact Summary Tab. We also assigned an icon just to keep the look of our tabs consistent.
For this view, we need to indicate in the Form Settings that the report should be filtered to show only the Gadget Loans activities for the Contact being Viewed.
In Conclusion
This Gadget Loan tracking system demonstrates how CiviCRM can be leveraged to build custom applications that meet the unique needs of an organization. Using SearchKit and FormBuilder we focused on tracking gadget loans, but the same approach can be taken for any scenario where you might need to log, track, and/or report on constituent activities.