User Directories with WordPress and CiviCRM
It’s been six years since we wrote about a project where we used WordPress User Taxonomies to build a directory. Although that website is still working fine, it’s about time for an update on how we would approach such a project today.
For the organizations that we typically work with, such as nonprofits and local business associations, we would today recommend CiviCRM for setting up directories. As a Constituent Relationship Management tool, it already provides the necessary components for building directories – namely, profiles and methods for categorizing them. Organizing and displaying your directory becomes simply a matter of customization and presentation.
So if you’re already using CiviCRM, or you’re ready to start, here’s how you can introduce a user directory to your website. You can see our working example – and log into the back-end to try it out yourself! – at the Tadpole WordPress CiviCRM Demo website.
CiviCRM Profiles
As the average internet user thinks about it today, the term profile likely evokes an image of one’s personal Facebook or LinkedIn page: it’s a page that shows the information you’ve chosen to include. Within a given network or system, each profile represents an individual or company record.
Within CiviCRM, this concept is captured in the term contact. Every person (or company, group, entity, etc) is represented by a Contact Record, containing all of the information your organization stores for that person. Profile has a more meta definition in CiviCRM: a CiviCRM profile is a type of abstraction of data, to be used for a specific purpose.
If that doesn’t make sense, think of a profile as a group of fields. You can create a profile, for example, that acts as a form. That form may incorporate user data, but it may include other data as well; rather than save all that data to the contact, we can simply associate the contact to that profile. This helps us keep our data better organized.
For more on how profiles work, check out the CiviCRM documentation.
In the case of our directory, we can create a profile called, “Member Directory”, and add to it the fields that we wish to display on each user’s directory page. This basically acts as a form for each entry in the directory.
Create a New Profile
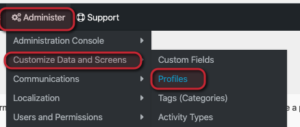
To create a new profile, navigate the CiviCRM menu under Administer > Customize Data and Screens > Profiles.
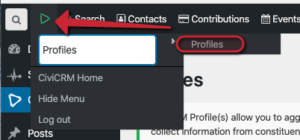
Alternatively, you can use the new Menu Search item in the top left area, and search for Profiles:
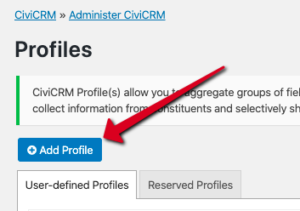
Once in the Profiles section, click Add Profile:
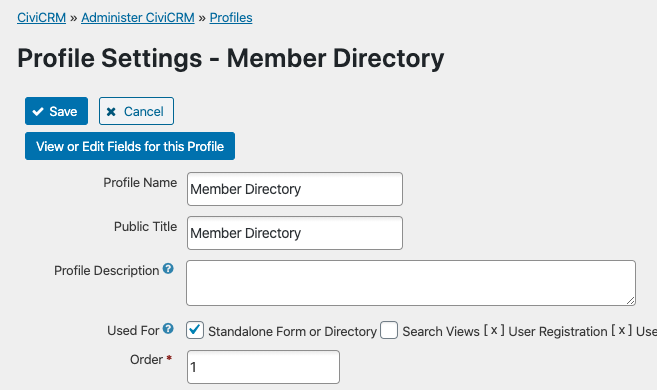
Here we have created a Profile called Member Directory. Under the “Used for” option we have selected “Standalone form or directory” since that is our intended purpose for this Profile.
We’ve left empty the fields for Pre-form Help and Post-form Help, but you could use these to give some instructions to users who are filling in the forms.
We’ve ticked the box to make this an active Profile, and opened the Advanced Settings menu to customize the profile further.

- We’ve limited the listings to a specific Group. This was a pre-existing Group that contains the Members that we want to include in our Member Directory. You can read more about CiviCRM Groups here.
- We’ve elected not to display a Cancel button as it’s not necessary for our purposes.
- We’ve changed the text for the Submit button to “Search” as we find that more descriptive.
- For the WordPress account creation options, we’ve selected “No account create options.” Because our Directory form is not intended for signing up new members, but rather for already existing members, we do not want to associate new account creations with the Member Directory profile.
- We do not want our profile to create any duplicate contacts so we’ve selected the option to “Update the matching contact” in case of any duplicate entries.
- Lastly, because this profile is not intended as a search form, we’ve disabled Proximity Search.
Adding Fields to the Profile
Now that our profile is created, the next step is to add fields to it. When you save a new profile, you’ll be brought to a screen that lets you choose fields to add:
To choose a field, you first select its source. In our example, we start with the First Name and Last Name, which are sourced from the Individual record. So we choose Individual, which then provides another dropdown from which to select First Name. The Field Label will fill in automatically with the Field Name, but you can change this if you want it to appear differently on the front-end interface.
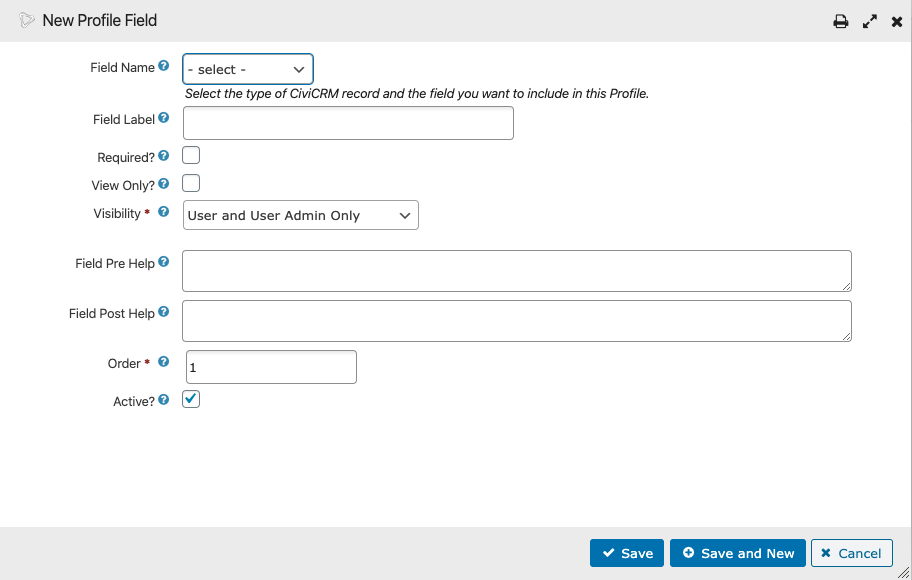
There are other options to select from, but they are fairly self-evident and we won’t go through them all here. You can always ask us for help if you need it! There is one option we want to stress, though, and that is the Visibility option. You want to set this to Expose Publically, because your goal is to create a public-facing Member Directory, and presumably you want most if not all of the fields to be shown on the public Member Directory pages. This is true even if you plan to make your directory only accessible to logged-in users, and hence not technically “exposed publically”. The meaning here is that the field will be displayed on the front-end directory pages, to anyone who is able to access those pages. Of course, you may include some fields in the directory that you don’t want displayed on the front-end, and in those cases, choose User and User Admin only.
Once we’ve added our selected fields, the profile looks like this:

Add the Directory Page
The last step is to add a page to your website for the directory. Create a new page and call it something appropriate like “Member Directory“. While editing this page, use the CiviCRM shortcode button to insert CiviCRM content.
From the CiviCRM shortcode menu, first choose Profile, then the name of your directory profile (in our case, “Member Directory”). For the next option, you likely want to pick “Search/Public Directory”. And for the last option, you can choose to override all page content or have the directory appear within the normal confines of a WordPress page (we prefer the latter).
There is one more option that we’ve added to our shortcode, and you may also find it useful. This is force="1". The default display of the directory home page will only show a search input – the user has to hit the Search button to show a list of member profiles. By using force="1", the page will auto-submit an empty search, returning all available results. This makes it so that the page shows a list of profiles when you first open it.
Insert the shortcode, publish the page, and voilà! You’ve got a directory!
Wrapping It Up
Hopefully, that wasn’t too complicated to follow. But we know that directories can actually be much more involved than just the above description. We haven’t even gotten into the design of the directory pages! (That would definitely need its own post). But we hope it can get you off to a good start. And of course, we welcome you to reach out to us if you’ve got questions.